
Resources · Use Case
Build Ask Anter — Part 1 + Part 2
This is the exact implementation flow we use for Ask Anter: first set up the platform (Part 1), then wire the chat experience with @anter/ai-chat-sdk (Part 2).
Use case definition
Use case
Customer gets accurate product/support answers from Ask Anter chat.
Scope
Agent Builder setup (Part 1) + landing chat integration (Part 2).
Primary actor
Ops/Builder configuring Ask Anter.
Supporting actors
Site visitor, Agent Runner API, Azure Foundry, Anter Internal MCP.
Trigger
A user opens Ask Anter on landing and sends a question.
Preconditions
- Organization access is available and you can create/select projects.
- You can store secrets (project API key, provider credentials) in a secure secret manager.
- You have an Azure Foundry endpoint + key and at least one deployed model.
- Anter Internal MCP is available for your workspace.
Minimal guarantees
- No long-lived credentials are exposed in browser code.
- If a configuration step fails, previous saved state remains intact.
Part 1 — Platform setup
Step 1
Create project
Where: /agent-builder/projects
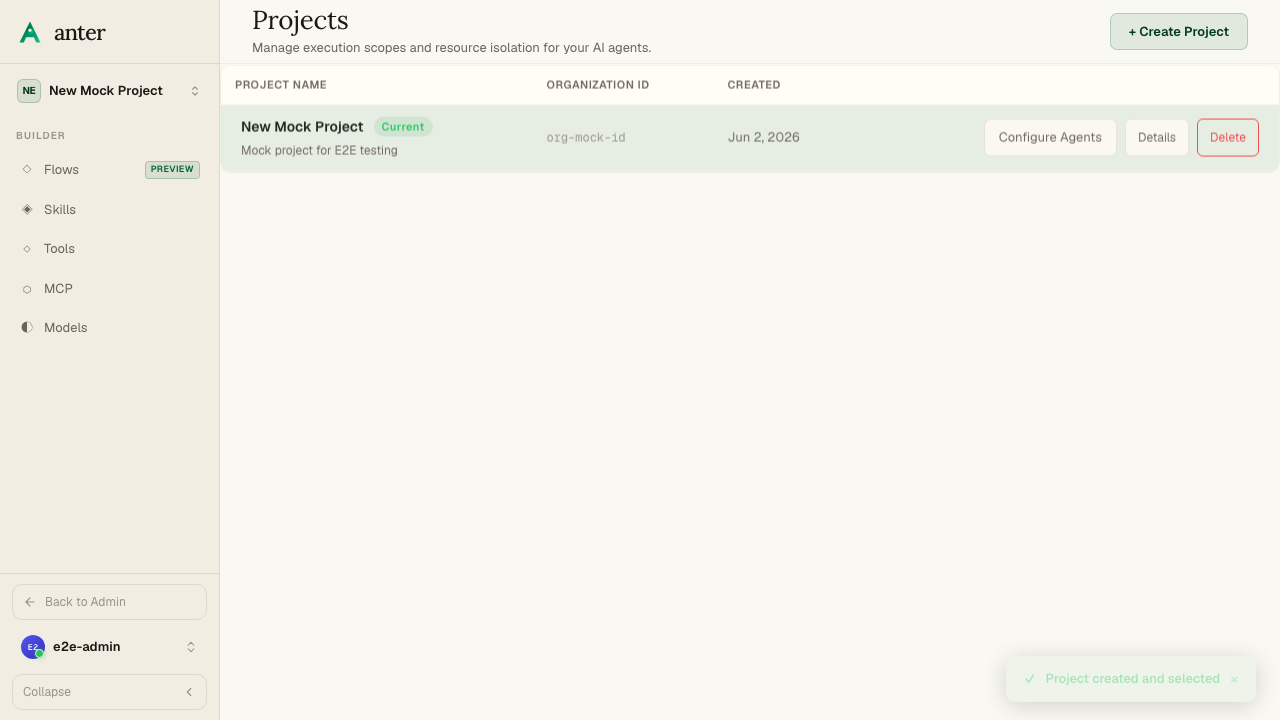
Create and select the project that will contain your full Ask Anter bot stack.
Actions
- Open "Projects" and click "+ Create Project".
- Set project name and description, then click “Create & Select Project”.
- Confirm the new project is marked as “Current”.
Beginner track
Treat this as your isolated workspace. Everything in Part 1 (tools, keys, models, agent graph) should live in this project.
Technical track
The project context drives all downstream API scopes (keys, MCP enablement, providers, and agent resources).
Step 2
Create project API key and save it
Where: /agent-builder/projects → Details
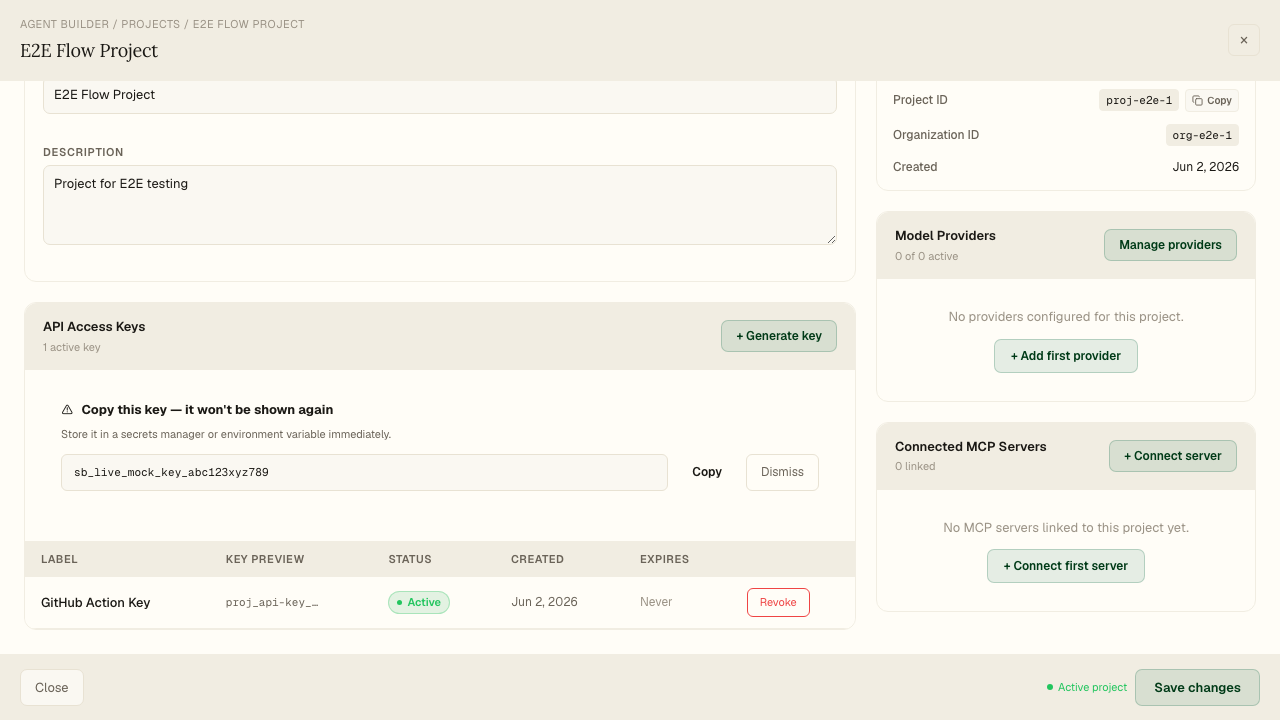
Generate a project-scoped key for secure runtime access in your chatbot integration.
Actions
- Open your project row and click "Details".
- In "API Access Keys", click "+ Generate key".
- Enter a key label and click “Create key”.
- Copy and store the plaintext key immediately in your secret manager.
Beginner track
The key is shown once only. Save it before closing the panel, then keep it in your environment secrets.
Technical track
Persist as a server-side secret (never client-side). Rotate keys on schedule and update deployment secrets atomically.
Step 3
Enable Anter Internal MCP and bulk import tools
Where: /agent-builder/mcp-servers
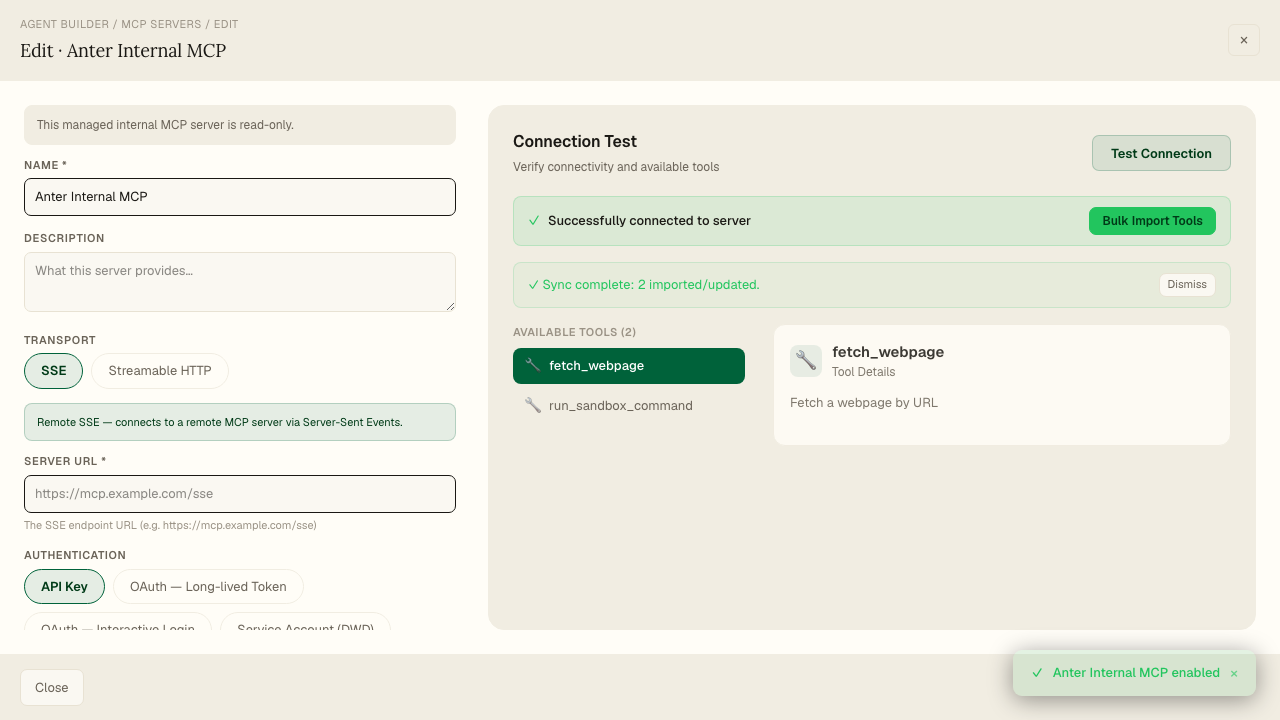
Activate the managed internal MCP and sync tools needed by your Ask Anter flow, including knowledge-base search capability.
Actions
- Open "MCP", switch to "Catalog", and enable "Anter Internal MCP".
- Open the connected server details and run "Test Connection".
- Click "Bulk Import Tools" to sync discovered tools into the project.
- Verify the required knowledge-base tool (`search_knowledge_base`) is available for agent assignment.
Beginner track
If your imported list differs by environment, confirm with your team which internal tool name maps to your KB search capability.
Technical track
This step establishes server connectivity and materializes MCP tools as project tools that can be attached to sub-agents.
Step 4
Create LLM provider (Azure Foundry example)
Where: /agent-builder/llm-providers
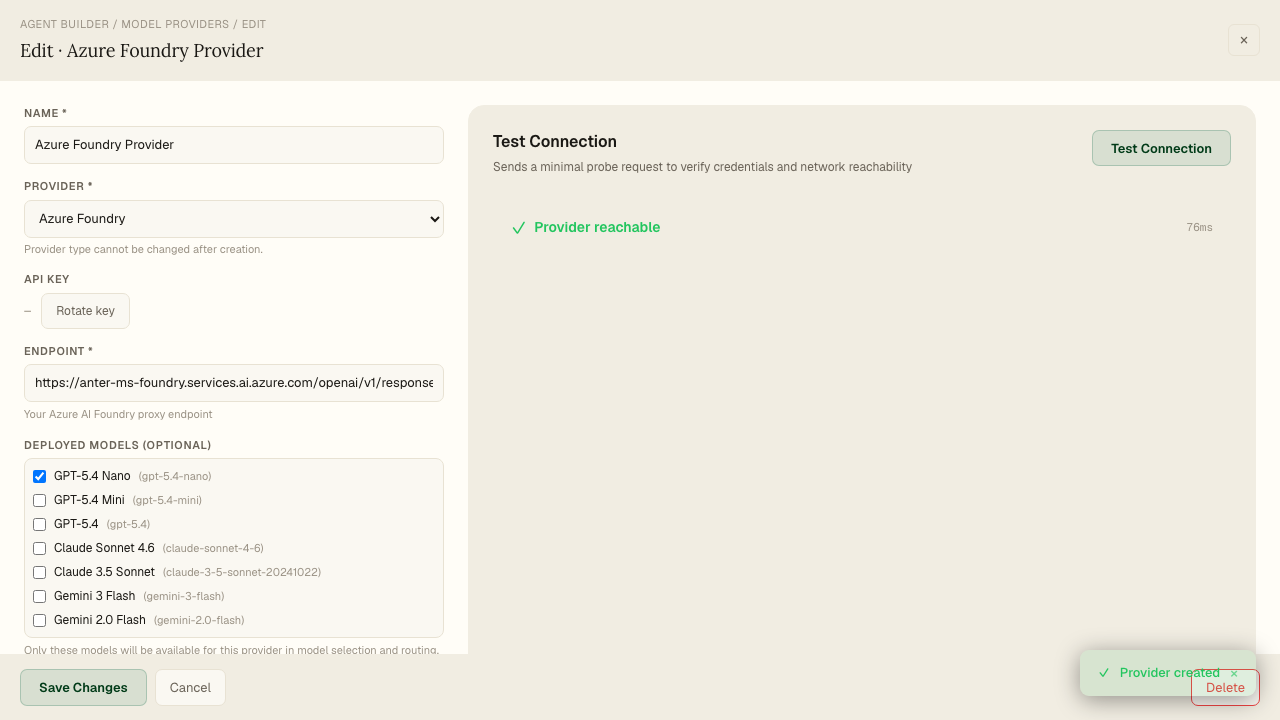
Register and validate the model provider used by your agent and sub-agents.
Actions
- Click "+ New Provider" and set provider type to "Azure Foundry".
- Enter provider name, endpoint, and API key.
- Create provider, open it, and run "Test Connection".
- Confirm deployed model visibility (example: `gpt-5.4-nano`).
Beginner track
Use the exact endpoint format from your Azure deployment and verify before continuing to agent setup.
Technical track
Provider IDs are used in model selectors and can be combined with model names for explicit overrides in flow/sub-agent settings.
Step 5
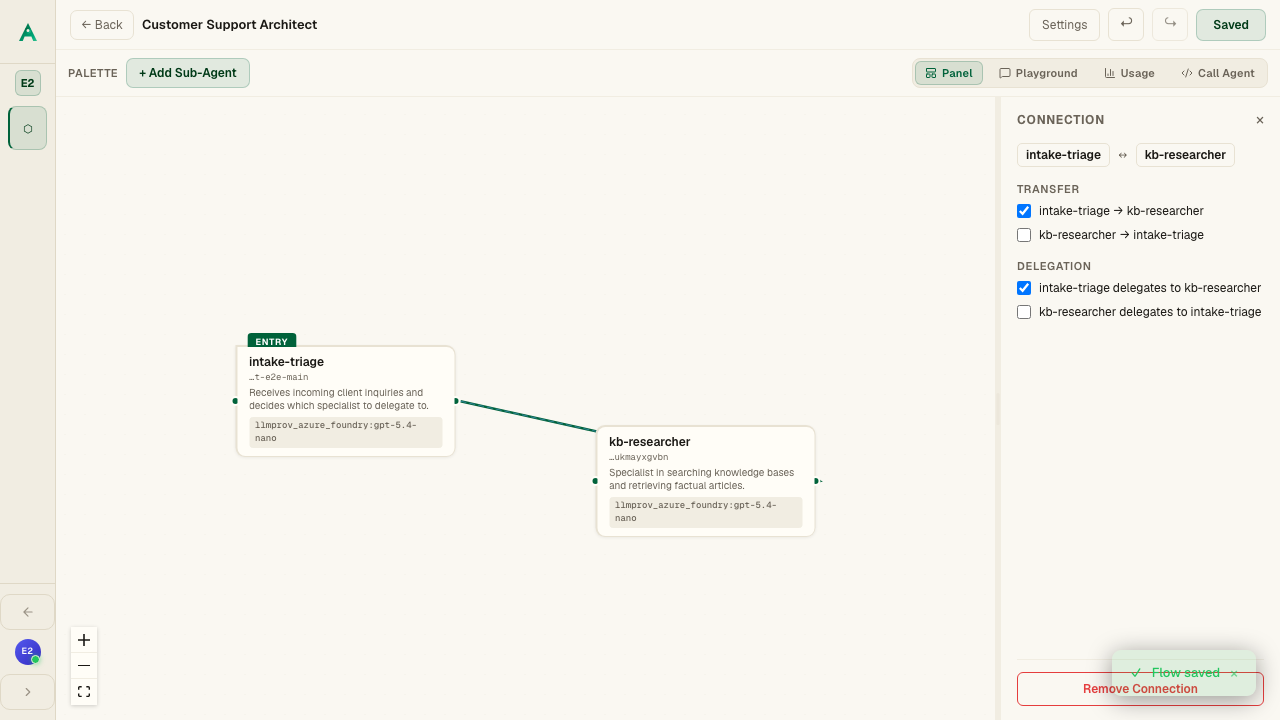
Onboard an agent
Where: /agent-builder/flows
Create the initial Ask Anter flow agent and baseline configuration so it is ready for sub-agent expansion and runtime calls.
Actions
- Open "Flows" and click "Onboard Agent".
- Open "Settings" and configure name, description, and model/provider.
- Save flow settings, then save changes to persist the topology.
Beginner track
Start with one clear orchestrator role (what this agent should do and what it should not do).
Technical track
Use explicit provider/model selection and maintain deterministic prompts before adding specialized sub-agents.
Part 2 — Chat widget implementation with @anter/ai-chat-sdk
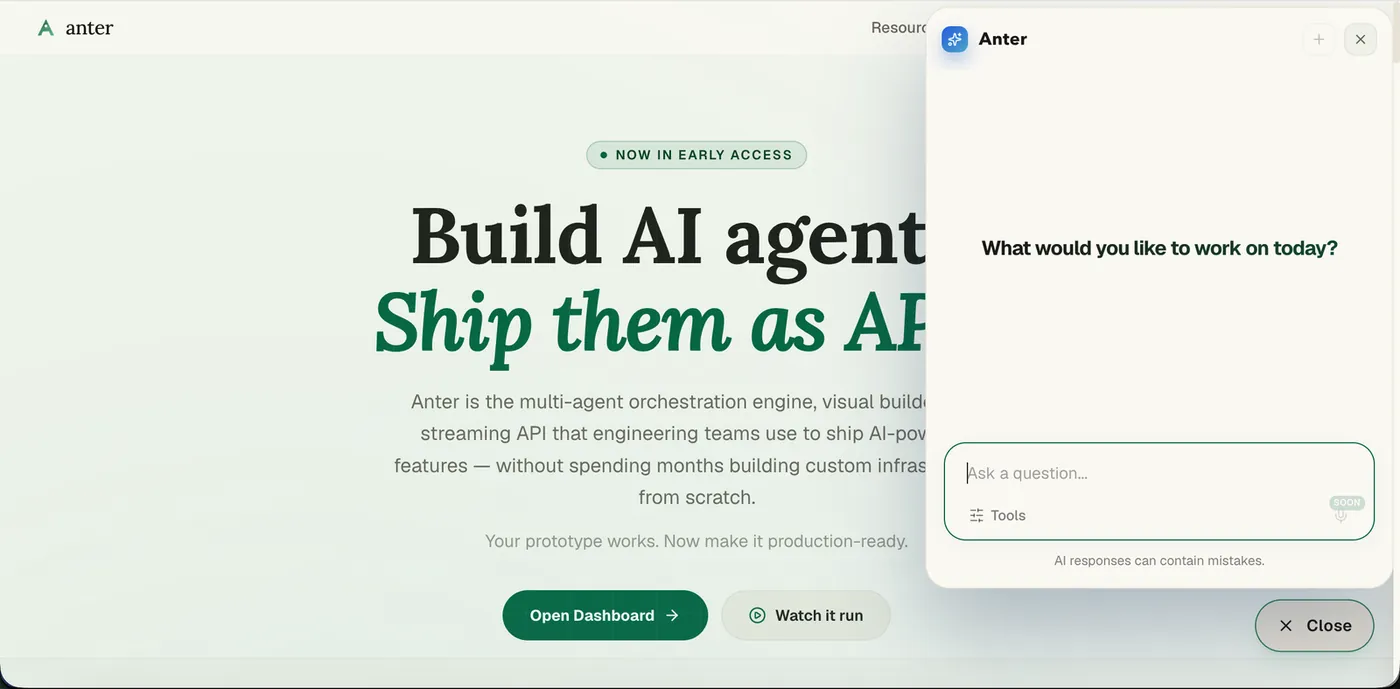
The implementation below mirrors the live landing integration in apps/landing/src/main.tsx, apps/landing/src/App.tsx, and apps/landing/src/lib/landing-adapter.ts.
@anter/ai-chat-sdk reference page.Step 1
Install SDK and load widget styles
Where: apps/landing/src/main.tsx
Enable chat UI rendering and base widget behavior in your app shell.
Actions
- Install `@anter/ai-chat-sdk` in your app package.
- Import SDK styles once at app entry: `import "@anter/ai-chat-sdk/styles-no-base.css";`
- Keep your own app styles imported before/after based on your CSS cascade preference.
Beginner track
Without the SDK stylesheet, the widget can mount but will look broken or unstyled.
Technical track
Use `styles-no-base.css` (as landing does) to avoid global CSS resets and keep host styling control.
Step 2
Implement a ChatAdapter that streams to your Part 1 agent
Where: apps/landing/src/lib/landing-adapter.ts
Connect the chat widget to the agent-runner stream endpoint for the exact agent created in Part 1.
Actions
- Create a class implementing `ChatAdapter` from `@anter/ai-chat-sdk/types`.
- Set stream path to `/api/v1/external/agent-runner/agents/<agent_id>/run-stream`.
- In `sendMessage`, POST JSON with `message`, `organizationId`, and a `contextVariables` object carrying per-session `userId` + `sessionId`.
- Return `res.body` as stream and keep session methods as lightweight stubs if using stateless runtime.
Beginner track
Think of adapter as the bridge between chat UI and your agent endpoint.
Technical track
Landing uses a proxy path (`/api/...`) and worker header injection so project/API secrets never ship to the browser.
Step 3
Wrap app with ChatProvider
Where: apps/landing/src/App.tsx
Provide runtime chat context, org scope, adapter wiring, and UX configuration.
Actions
- Instantiate your adapter with `VITE_CHAT_AGENT_ID` (`new LandingChatAdapter(chatAgentId)`).
- Pass `organizationId` from `VITE_ORG_ID` (fallback allowed for local dev).
- Set `config` flags to match your product experience.
- Set user-facing strings such as composer placeholder and disclaimer.
Beginner track
This is the required wrapper. Place your page/router content inside `ChatProvider`.
Technical track
Landing disables model selector, slash commands, command palette, and uploads; it enables artifacts.
Step 4
Mount ChatWidget and choose interaction pattern
Where: apps/landing/src/App.tsx
Expose the widget trigger and tune open/close behavior for your site layout.
Actions
- Add `<ChatWidget position='bottom-right' title='Anter' />` under your page content.
- Optionally keep full chat navigation disabled (`fullChatUrl={() => '#'}; onNavigate={() => undefined}`).
- Use custom `trigger` render prop if you want branded button UI like Ask Anter.
- Optionally handle external open events (landing listens to `anter:open-chat`).
Beginner track
Default widget works immediately; custom trigger is optional polish.
Technical track
Landing maps trigger state to `aria-label` and uses event-driven open for CTA integrations.
Code pattern: adapter
import type { ChatAdapter, MessagePayload } from "@anter/ai-chat-sdk/types";

export class LandingChatAdapter implements ChatAdapter {
  constructor(private readonly agentId: string) {}

  private get streamPath(): string {
    return `/api/v1/external/agent-runner/agents/${this.agentId}/run-stream`;
  }

  async sendMessage(payload: MessagePayload): Promise<ReadableStream<Uint8Array>> {
    const res = await fetch(this.streamPath, {
      method: "POST",
      headers: { "Content-Type": "application/json" },
      body: JSON.stringify({
        message: payload.message,
        organizationId: payload.organizationId,
        // contextVariables flow through to the agent. Pass per-session identity
        // so the runner can scope memory/history to this conversation.
        contextVariables: {
          ...(payload.contextVariables ?? {}),
          userId: `chat-widget-${payload.sessionId}`,
          sessionId: payload.sessionId,
        },
      }),
    });
    if (!res.ok) throw new Error(`sendMessage failed: ${res.status}`);
    if (!res.body) throw new Error("sendMessage: missing response body");
    return res.body;
  }
}
Code pattern: provider + widget
import { ChatProvider, ChatWidget } from "@anter/ai-chat-sdk";
import { LandingChatAdapter } from "./lib/landing-adapter";

const organizationId = (import.meta.env.VITE_ORG_ID as string | undefined) ?? "anter";
const chatAgentId = import.meta.env.VITE_CHAT_AGENT_ID as string;
const adapter = new LandingChatAdapter(chatAgentId);

<ChatProvider
  organizationId={organizationId}
  adapter={adapter}
  config={{
    theme: "light",
    enableModelSelector: false,
    enableSlashCommands: false,
    enableCommandPalette: false,
    enableFileUpload: false,
    enableSlashFocusShortcut: false,
    enableArtifacts: true,
  }}
  strings={{
    composerPlaceholder: "Ask a question...",
    footerDisclaimer: "AI responses can contain mistakes.",
  }}
>
  {page}
  <ChatWidget position="bottom-right" title="Anter" />
</ChatProvider>
Configuration options used on landing
| Option | Landing value | Why used | Other options |
|---|---|---|---|
enableModelSelector | false | Keep model choice controlled by backend/flow configuration. | Set `true` to expose model switching to end users. |
enableSlashCommands | false | Simplify consumer-facing UX. | Set `true` for power-user workflows and command shortcuts. |
enableCommandPalette | false | Avoid advanced command UI in public marketing chat. | Enable for internal apps or operator consoles. |
enableFileUpload | false | Limit public-surface risk and keep scope to text chat. | Enable for document workflows once validation is in place. |
enableSlashFocusShortcut | false | Prevent accidental shortcut conflicts on landing pages. | Enable for app-like experiences with keyboard-heavy users. |
enableArtifacts | true | Allow rich response rendering with artifacts. | Disable if your use case requires strict plain-text output only. |
Alternative flows and recovery paths
MCP connection test fails
Reopen Anter Internal MCP details, rerun Test Connection, then Bulk Import Tools only after success.
Knowledge-base tool is missing after import
Repeat Bulk Import Tools, then verify `search_knowledge_base` appears in project tools before onboarding flow logic.
Provider reachable but target model unavailable
Update deployed model list in Azure Foundry, then rerun provider test and reselect model in flow settings.
Project API key was not saved
Generate a new key immediately and rotate the old one; keep only secret-manager copies.
Chat stream call returns non-OK status
Check worker-injected headers (`x-project-id`, `x-api-key`), organizationId, and agentId path in ChatAdapter.
Postconditions (success guarantees)
- A configured Ask Anter flow agent exists and is callable.
- Landing chat widget streams responses from the Part 1 agent endpoint.
- Knowledge retrieval path is available through imported internal tools.
x-project-id / x-api-key there, not in browser code.